
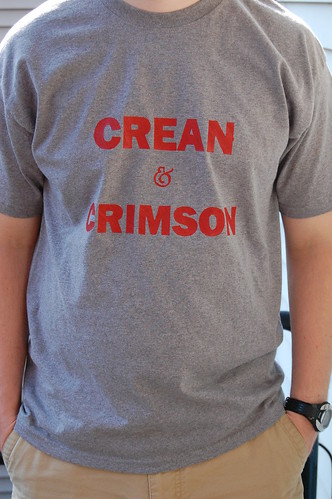
1. Print or draw design on the paper side (as opposed to plastic-coated side) of some freezer paper.
2. Use a utility knife to carefully cut out design.
3. Lay out T-shirt with a piece of cardboard between the layers of fabric to keep the paint from bleeding through.
4. Position the freezer paper stencil on the T-shirt, plastic-coated side down, and iron it. Use the hottest setting appropriate for your fabric and make sure the stencil is stuck securely to the shirt all around the edges of the design.
5. Using a medium or large brush, stipple your fabric paint all over the stencil until it looks completely opaque.
6. Let the paint dry completely and then carefully peel the stencil off the T-shirt.
7. Heat set the paint by ironing on the reverse side of the fabric. I like to put a piece of cardboard between the shirt's layers again just in case I missed a damp spot in the paint or something.
2 comments:
What is freezer paper????
Before I read about using it as a stencil on T-shirts, I had never heard of freezer paper either! It is basically just paper with a plastic-type coating on one side, and it's in the same part of the grocery store as the wax paper and foil and such. I've only ever seen the Reynolds brand of it, so I'm not sure if anyone else makes it.
Here is a link to the product on the Reynolds site.
Post a Comment